RV Setup Checklist: What To Do When You Arrive at Camp
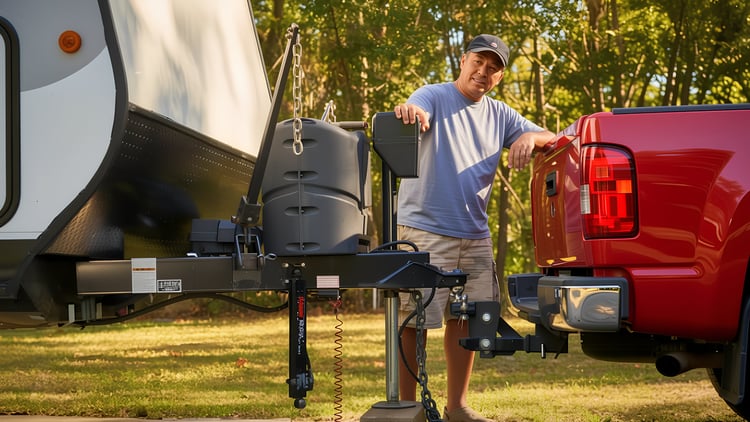
Finally made it to camp after hours of driving? Here's your step-by-step guide to getting settled without the headache—because nobody wants to troubleshoot hookups in the dark.
The Golden Rule: Safety First, Comfort Second
Before we dive into the nitty-gritty, remember this: a rushed setup is a stressed setup. Take your time, especially if you're new to the game. Your future self (and your camping neighbors) will thank you for doing things right the first time. There's nothing worse than having your perfectly level RV become not-so-level because you forgot to set the parking brake and got that annoying little roll when you stepped out. If this is your first time navigating arrival logistics, our guide on the first time RV living reality covers what those early experiences actually feel like — and how to manage them.
Your Complete RV Arrival Checklist
Phase 1: Site Assessment & Positioning (10–15 minutes)
□ Survey your campsite thoroughly: Walk around the entire site before you commit to a parking spot. Check for overhead hazards like low branches that could scrape your roof or knock into your A/C units, satellite dome, or vent covers. Look for power lines—even if they seem high enough, your slide-outs or awning might extend closer than you think. Take note of any rocks, stumps, or debris that could damage your slides when they extend. This is also when you figure out the best angle to park for shade throughout the day. If you're heading to a beach site, our beach RVing for boondockers guide covers the additional site assessment steps specific to sand and tidal conditions.
□ Locate your hookups and measure distances: Find your electric pedestal, water spigot, and sewer connection. Before you position your RV, make sure you have enough sewer hose, fresh water hose, and electrical cord to reach each connection comfortably. There's nothing more frustrating than being two feet short on your sewer hose and having to reposition your entire rig. Most RVs need their hookups on the driver's side, but double-check your specific setup.
□ Position your RV strategically: Park with your hookup side closest to the utilities, but leave yourself enough room to open slides, extend your awning, and set up outdoor furniture. Think about privacy too—you don't want your main window facing directly into your neighbor's setup if possible. Consider the sun's path throughout the day; morning sun on your dinette windows is nice, but afternoon sun blazing through your bedroom might make for uncomfortable napping.
Phase 2: Leveling RV & Initial Setup (15–20 minutes)
□ Level side-to-side first (most critical): Your RV refrigerator won't work properly if you're off by more than three degrees from level—the ammonia absorption cooling system depends on being level to function correctly. Use a magnetic level, your RV's built-in level, or download a smartphone app like iHandy Level, Bubble Level, or even the built-in level app on newer iPhones. If you need to drive onto leveling blocks, use several blocks to create a gradual ramp rather than trying to hit a single high block. Interlocking blocks and curved ramp style blocks work great and won't slip out from under your tires. If you are in a motorhome, some of the next steps will not apply.
□ Set your parking brake of the tow vehicle: Now that you're level left to right, set that parking brake to prevent any rolling while you work on the rest of your setup. This is crucial—you don't want the RV moving while you're unhitching or making other adjustments.
□ Install wheel chocks immediately: As soon as you're side-to-side level and have set the parking brake, install your wheel chocks. If you aren't using an "X" style chock, place them on the downhill side of your tires, or on both sides if you're on a slope. This prevents any potential rolling during the unhitching process and provides extra security throughout your stay.
Phase 3: Unhitching & Final Leveling (10–15 minutes)
□ Unhitch your travel trailer (if applicable): Now it's time to unhitch if you're towing. Lower your stabilizer jack onto stabilizer jack blocks until it's supporting some weight, but don't lift the trailer completely off the hitch ball yet. Disconnect your safety chains first, then your electrical connection (always pull straight out, never yank sideways), and finally disconnect your brake controller wire if you have electric brakes. Now you can crank the jack to lift the coupler off the hitch ball. Store your hitch in your truck bed, or better yet, get a large, sturdy storage bin with a tight-fitting cover and store it underneath your trailer—this keeps it secure and out of the way while protecting it from the elements. If you haven't towed before or want to tighten up your technique, our complete guide on how to tow a travel trailer covers everything from hitch setup to driving technique.
□ Level front-to-back after unhitching: For travel trailers, this is when you adjust your tongue jack to get your front-to-back level perfect. The unhitching process will have changed your front-to-back level since you lifted the trailer off the hitch, so now you can fine-tune it. For motorhomes with auto-leveling systems, this is where that fancy technology pays for itself—just hit the button and let it work. If you're doing it manually, small adjustments make a big difference. An inch or two of tongue jack movement can completely change your front-to-back level.
□ Stabilize your RV: Here's where people get confused: stabilizer jacks are not leveling jacks. Their job is to reduce bounce and sway, not to lift your RV. Before extending your stabilizer jacks, place blocks or pads under each jack foot. This distributes the weight over a larger area, prevents the jacks from sinking into soft ground, and protects the jack feet from damage on concrete or asphalt. Extend your stabilizer jacks at all four corners until they just touch the blocks with slight pressure. Be sure you don't lift the RV, which puts stress on the frame and can cause problems with doors and windows not closing properly.
Phase 4: Connecting Utilities & Hookups (20–25 minutes)
Note: If your family needs quick access to the bathroom or interior comforts after a long drive, you can hook up electricity and water before unhitching.
□ Electrical hookup (do this safely): Check the campground pedestal to make sure it matches your RV's electrical system (30- to 50-amp, or 50- to 30-amp), and ensure it is turned off. If you have a 50-amp RV but only a 30-amp pedestal is available, you'll need a dogbone adapter, but be mindful that you can't run everything at once. We highly recommend using a surge protector 100% of the time when plugging in to any electric pedestal—you never know when a faulty pedestal could fry your RV's entire electric system. Connect your power cord firmly—a loose connection can cause arcing and potentially start a fire. Once connected, turn the pedestal breaker on and make sure everything's working. For a deeper dive into what can go wrong at the pedestal, our article on RV shore power hookup mistakes is worth reading before your next trip.
□ Water connection (protect your plumbing): Use a water pressure regulator every single time—seriously, don't skip this step. City water pressure can exceed 100 PSI, while your RV's plumbing is typically rated for 40–60 PSI. A $15 regulator can save you hundreds in burst pipe repairs. Connect your fresh water hose to the campground spigot first, then to your RV. Turn the water on slowly and check for leaks at both connections. Test the water pressure inside your RV by running a faucet. If the pressure seems too high even with a regulator, you can adjust most regulators or get one with a lower setting. If you're new to how fresh water, gray water, and black water all work together, our RV plumbing 101 guide is the clearest explanation out there.
□ Sewer connection (the glamorous part): Put on disposable gloves—trust us on this one. Connect your sewer hose kit to your RV's black water outlet first, making sure the bayonet fittings are properly aligned and twisted tight. Ensure your hose has a downward slope all the way to the campground connection—gravity is your friend here—and always have sewer hose supports with you. Secure the hose at the campground end with a weight or bungee cord so it doesn't pop out. Keep your gray water valve closed initially; you'll want to fill that tank about 2/3 full before dumping it, as the gray water helps flush your black tank.
THE COMPLETE RV MAINTENANCE GUIDE
GET OUR FREE 30-PAGE RV MAINTENANCE GUIDE NOW
Phase 5: Interior & Exterior Setup (15–20 minutes)
□ Extend slides carefully: Before hitting any buttons, walk around your RV and make sure the slide-out path is completely clear of rocks, picnic tables, trees, or anything else that could cause damage. Extend slides slowly and watch for any binding or unusual sounds. If a slide stops partway, don't force it—check for obstructions. Most slide problems happen because someone rushed this step.
□ Deploy your awning (check wind conditions first): Even a light breeze can turn awning deployment into a wrestling match. If it's windy, wait or skip the awning altogether—a damaged awning can cost thousands to replace. When extending, make sure both arms come out evenly. Set a slight pitch toward one end so rain runs off rather than pooling. If wind picks up later, don't hesitate to retract the awning; it takes seconds to put back out, but hours (and dollars) to repair if it gets damaged.
□ Interior comfort systems: Turn on your propane at the tank (usually located in a front compartment), then light your pilot lights or turn on electronic ignition for your water heater, furnace, and refrigerator if needed. Modern RVs mostly have automatic ignition, but older units might require manually lighting pilots. Check that all your windows and roof vents open properly—you'll want good ventilation for cooking and sleeping comfort.
□ Set up your outdoor living space: Deploy your outdoor rug, set up chairs, and organize your outdoor kitchen if you have one. This is also a good time to set up any outdoor lighting—string lights or lanterns make a huge difference in camp ambiance and safety after dark.
Phase 6: Safety Checks & System Verification (10 minutes)
□ Test all safety equipment: Press the test buttons on your smoke detectors, carbon monoxide detector, and propane detector. Replace batteries if any units beep or show low battery warnings. Check that your fire extinguisher is easily accessible and the pressure gauge shows it's properly charged. Make sure emergency exits (windows and doors) aren't blocked by furniture or gear.
□ Run a complete system check: Turn on your water pump (if boondocking) and check for proper pressure throughout the RV. Test your 12-volt lighting, USB ports, and 120-volt outlets. Run your refrigerator, air conditioner (if needed), and water heater to make sure everything's functioning properly. This is the time to discover problems, not when you're trying to cook dinner or take a shower. A battery monitor mounted in your RV makes it easy to catch low voltage before it becomes a no-power situation—especially useful for boondockers who can't rely on shore power. If you're running on batteries without hookups, our guide on boondocking without hookups covers power management in detail.
□ Final safety walkthrough: Double-check that all utility connections are secure and leak-free. Verify your RV is stable and level. Make sure propane connections are tight and you don't smell any gas. Confirm that your emergency equipment is accessible and your exits are clear. Checking your tires as part of every arrival routine — not just before departure — is a habit worth building; our breakdown of why your RV battery keeps dying applies the same logic: small checks prevent expensive surprises.
Pro Tips from Seasoned Road Warriors
The Setup Kit Strategy: Keep all your setup essentials in one dedicated container—water pressure regulator, rubber gloves, bubble level, wheel chocks, electrical tester, and a good LED flashlight. Having everything in one place makes you look like a pro and actually feel like one too.
The 20-Minute Rule: If you arrive at camp with less than 20 minutes of good daylight, prioritize getting level, stable, and connected to water and electricity. Everything else can wait until morning. Fumbling with sewer connections by flashlight while mosquitoes feast on you is nobody's idea of vacation fun.
Weather Awareness Protocol: Check your weather app before setup. If rain is forecast, get your awning positioned to direct water away from your door and set up a tarp over your outdoor cooking area. If wind is expected, skip the awning deployment entirely or take it down early. Severe weather can turn a $200 awning into a $2,000 insurance claim in minutes.
The Photo Documentation Trick: Before you pack up to leave any campground, take a quick photo of your utility connections and how you positioned your RV. It's incredibly helpful when you return to the same campground later, especially at places with tricky hookup layouts or challenging sites.
Common Setup Mistakes (And the Real-World Consequences)
Skipping the water pressure regulator: This isn't just a suggestion—it's insurance for your plumbing system. City water pressure can reach 120+ PSI, while RV plumbing is typically rated for 40–60 PSI. One burst pipe inside your walls can cause thousands in water damage and turn your vacation into a nightmare. Even if the campground has "low pressure," pressure fluctuates throughout the day as usage changes. A $15 regulator is infinitely cheaper than replumbing your RV or dealing with water damage to flooring, cabinets, and furniture.
Leveling after extending slides: This mistake can bend slide mechanisms, crack seals, or even prevent slides from retracting when it's time to leave. The weight and stress distribution changes significantly when slides are extended, and trying to level afterward puts enormous strain on the slide hardware. Always level first, then extend slides. If you mess this up, retract everything, level properly, then extend again.
Connecting sewer hose uphill or without proper slope: Gravity doesn't work uphill, and a flat sewer hose won't drain properly. This leads to waste backing up in your hose, creating unsanitary conditions and potential blockages. Always ensure a consistent downward slope from your RV to the campground connection. If the campground connection is higher than your RV outlet, be sure to use sloping sewer hose supports, or you'll need to move your RV or use your internal tanks and dump elsewhere.
Rushing electrical connections or ignoring proper voltage: Plugging in without turning off your main breaker can cause dangerous arcing. Not checking if the pedestal matches your RV's electrical needs can trip breakers, damage appliances, or create fire hazards. A loose electrical connection generates heat and can literally start a fire. Take the extra 30 seconds to do it right.
Over-extending stabilizer jacks: Stabilizer jacks are not leveling jacks, and lifting your RV off its suspension can cause all sorts of problems. Doors and windows may not close properly, cabinets can bind, and you're putting stress on the frame that it wasn't designed to handle. The goal is stability, not lifting.
Setup Time Reality Check
First-time RVers: 60–90 minutes (and that's okay!)
Casual weekend warriors: 45–60 minutes
Experienced RVers: 30–45 minutes
Full-timers with refined systems: 20–30 minutes
Competition-level setup veterans: 15–20 minutes
Don't feel pressured to match someone else's speed. Every RV is different, every campsite presents unique challenges, and everyone's comfort level varies. The goal is to arrive safely, set up correctly, and enjoy your time at camp. Speed comes naturally with experience, but shortcuts often lead to problems. Our RV maintenance checklist uses the same systematic logic — build the habit first, and efficiency follows.
Seasonal and Weather Considerations
Hot Weather Setup: Position your RV to maximize shade during the hottest part of the day. Set up your awning on the sunny side if possible, and consider bringing a portable shade structure or zippered awning screen for your outdoor living area. In desert climates, afternoon shade is more valuable than morning sun.
Cold Weather Considerations: In freezing temperatures, connect your water hose last and disconnect it first when leaving. Consider using a heated hose or letting faucets drip slightly to prevent freezing. Your gray and black tanks are more protected than your external hose.
Rainy Day Setup: If you arrive in rain, prioritize getting your RV level and connected to electricity so you can get inside quickly. Everything else can wait. Keep towels handy for wiping down wet electrical connections before plugging in.
The Bottom Line: Your Setup System
Every RVer eventually develops their own setup routine based on their specific RV, travel style, and experience level. Use this checklist as your foundation, then adapt it to your needs. Maybe you prefer to set up your outdoor kitchen before connecting utilities, or perhaps you have a specific order for testing your systems. The best setup system is the one that works consistently for you and keeps you safe. Once you've nailed arrival, the next step is keeping your rig in shape between trips — our RV solar setup guide is a great place to start if you want more flexibility about where you can park and how long you can stay.
The goal isn't perfection—it's confidence and safety. With a solid routine and this comprehensive checklist, you'll roll into any campsite knowing exactly what to do and why you're doing it. That feeling of being properly set up, everything working correctly, and ready to enjoy your destination? That's what great RV memories are made of. Arrival is only half the routine — the free Complete RV Maintenance Guide covers the between-trips half, with a seasonal calendar built to live in the RV.
Remember, even experienced RVers occasionally make mistakes or encounter unexpected challenges. The key is having a systematic approach that you can fall back on, whether you're setting up in perfect conditions or dealing with a challenging site in less-than-ideal weather. If you want to see how all of this fits into the bigger picture of life on the road, our RV healthy living guide covers how to build sustainable daily routines around wherever you're parked.
FAQs
What is the correct order for setting up an RV when you arrive at a campsite?
The correct order is: assess and position your site, level side-to-side, set your parking brake, install wheel chocks, unhitch your trailer (if applicable), level front-to-back, stabilize the RV, then connect utilities in this sequence — electricity first, then water, then sewer. Following this order protects your refrigerator (which needs to be level to cool properly), your frame (which shouldn't be leveled with slides extended), and your plumbing (which can be damaged by high city water pressure without a regulator). Doing it out of order is one of the most common sources of RV damage at campsites.
Do I need a water pressure regulator at every campground?
Yes, every single time — no exceptions. City water pressure at campgrounds can range from 40 PSI to over 120 PSI, and RV plumbing systems are typically rated for 40–60 PSI. A pressure spike at the high end of that range can burst your water lines, damage fittings, and cause hundreds or even thousands of dollars in water damage to flooring, walls, and cabinets. A basic adjustable water pressure regulator costs $15–$40 and attaches in seconds between the campground spigot and your fresh water hose.
What is the difference between stabilizer jacks and leveling jacks on an RV?
Leveling jacks are designed to lift and level the RV, correcting both side-to-side and front-to-back imbalance. Stabilizer jacks are designed only to reduce bounce and sway once the RV is already level — they should never be used to lift the vehicle off the ground. Over-extending stabilizer jacks can damage the RV's frame, cause doors and windows to bind, and void manufacturer warranties. Always complete your leveling before deploying stabilizers, and place pads or blocks under each stabilizer foot to distribute weight and prevent sinking into soft ground.
How long does it take to set up an RV at a campsite?
Setup time varies significantly by experience level. First-time RVers should expect 60–90 minutes for a full, safe setup. Casual weekend campers with a few trips under their belt typically finish in 45–60 minutes. Experienced RVers usually complete full setup in 30–45 minutes, while full-timers with a refined routine can often do it in 20–30 minutes. The goal is accuracy and safety, not speed — a rushed setup that skips leveling or proper utility connections costs far more time (and money) to fix than the 10 minutes you saved.
Should I leave my gray water valve open or closed while at a campsite?
You should keep your gray water valve closed until your gray tank is about two-thirds full, then dump it. Leaving the valve permanently open causes liquid to drain out continuously while solids accumulate, which leads to a buildup of waste in the tank that is harder to rinse clean. The gray water also serves a secondary function: when you dump your black tank first, following immediately with a full gray tank flush helps push residue through the sewer hose and keeps it cleaner. Check campground rules — some require all valves closed except during active dumping.
Can I use a 50-amp RV at a 30-amp campground pedestal?
Yes, but with limitations. You will need a dogbone adapter to connect a 50-amp RV cord to a 30-amp pedestal, and the adapter will cap your available power at 30 amps — approximately 3,600 watts at 120 volts. That means you cannot run your air conditioner and electric water heater simultaneously, or operate multiple high-draw appliances at once. Most RV systems are designed to handle this limitation gracefully, but you will need to be deliberate about staggering appliance use. Never use an undersized adapter the other direction — plugging a 30-amp RV into a 50-amp outlet requires the correct adapter to prevent overloading your RV's wiring.
What safety checks should I run every time I arrive at a campsite?
Every arrival safety check should include: testing the smoke detector, carbon monoxide detector, and propane detector; verifying your fire extinguisher is accessible and properly charged; confirming emergency exits are unobstructed; checking all utility connections for leaks or loose fittings; and smelling for any propane near connections. If you are boondocking, also check your battery state of charge before running any appliances. These checks take less than ten minutes and can prevent carbon monoxide poisoning, fires, and plumbing failures — the three most serious risks of improper campsite setup.



Categories
Related Posts
Subscribe to the Swervia Newsletter
The best RV stories, tips, and destinations—expertly curated and always free.